Everyone loves Popeyes and their fried chicken. What if I tell you that you can make the exact Popeyes fried chicken at your home. In this post, I am going to show you how you can do it.

Believe me; once you try this recipe, it will be better than the fried chicken that you eat at Popeye’s or any other outlet. Popeye’s make their fried chicken by marinating the chicken mixture of buttermilk and hot sauce overnight.
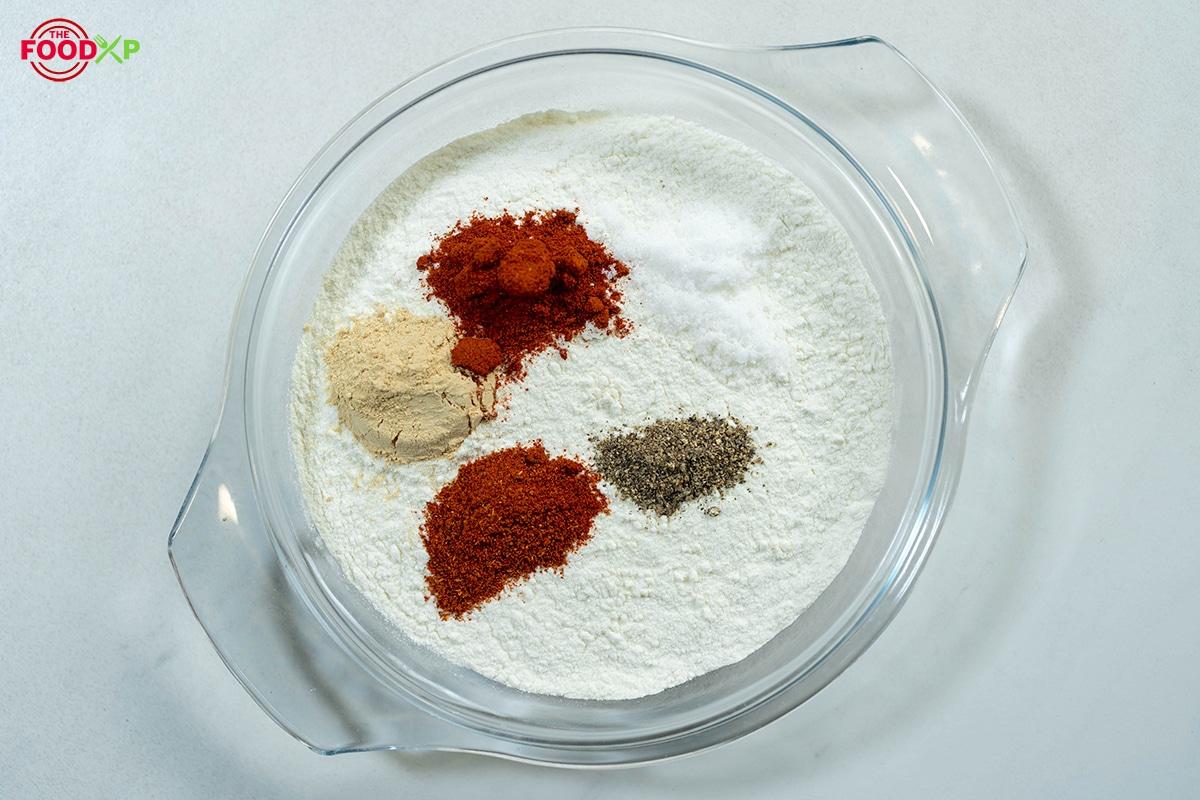
Moving forward, dip the chicken in the beaten eggs and dredge them in a flour mixture (flour, salt, black pepper, cayenne pepper, paprika and garlic powder). At last, fry those pieces in oil. Popeye’s fried chicken is ready!
Make sure you follow the complete recipe below, which tells cooking steps in detail on making a perfectly crispy fried chicken. But before getting the instructions, check out our other copycat recipes below.

1. Popeyes Buttermilk Biscuits – Popeyes buttermilk biscuits are easy-to-make fluffy biscuits. These biscuits are a smooth combination of buttermilk, milk, and all-purpose flour. These biscuits can be enjoyed as a side dish with any main course dish.
2. Popeyes Red Beans And Rice – Popeyes red beans and rice has red beans cooked to perfection with smoked ham. It’s spiced up by adding onion powder, garlic powder, salt, pepper, and lard. This dish is paired with steamed rice and can be enjoyed as a main course dish.
3. Popeyes Chicken Sandwich – Popeyes chicken sandwich is a soft and fluffy sandwich. It’s a delicious combination of chicken patty, mayonnaise, pickles, and spices. You can choose to add lettuce, tomatoes, and onions to this sandwich. This sandwich has fried chicken patty flavored with onion powder, garlic powder, and hot sauce.
4. Popeyes Cajun Rice – Popeyes Cajun rice is a hearty combination of steamed rice and Cajun spices. This dish has steamed rice cooked with ground beef and chicken. This mixture is braised with the flavors of garlic, celery flakes, salt, red pepper, and Cajun seasoning.
What's In The Post
How Is Popeyes Fried Chicken Different From The Other Restaurants Fried Chicken?
Popeyes fried chicken differs from other restaurants, including its unique flavor, texture, and preparation methods.
- Firstly, Popeyes is known for its signature blend of spices and seasonings, which gives its fried chicken a distinct flavor that sets it apart from other fast-food chains. The company uses a proprietary blend of spices, which includes cayenne pepper, paprika, garlic powder, and other seasonings, to create its signature flavor.
- Secondly, Popeyes fried chicken is often described as having a crispy and crunchy texture, achieved through special batter and frying techniques. The chicken is marinated in a buttermilk-based mixture before being coated in the batter, which creates a crispy crust when fried.
- Finally, Popeyes also uses a unique pressure-frying technique, which allows the chicken to cook faster and more evenly than traditional frying methods. This technique helps to lock in the moisture and flavor of the chicken, resulting in juicy and tender meat that is different from other fried chicken options.
Combining unique spices, crispy texture, and special preparation methods make Popeyes fried chicken a standout option in the world of fast-food fried chicken.

What Are The Tips To Make Popeyes Spicy Fried Chicken?
- If you are a sucker for spicy foods, you can make Popeye’s spicy fried chicken recipe spicier by increasing the cayenne pepper and black pepper to one tablespoon each in the batter.
- If you are a hardcore Popeyes fan, you must be aware that preparing their chicken is a 12-hour process. Keeping that in mind, it’s wise to marinate the chicken overnight to enjoy its best flavors.
- Try as many dipping sauces as you can with Popeyes fried chicken for the ultimate flavor ride.
What Kind Of Oil Does Popeyes Use To Fry Chicken?
Popeyes Louisiana Kitchen is known for its delicious and crispy fried chicken, but what kind of oil do they use to achieve that mouth-watering flavor?
According to the Popeyes website, the restaurant chain uses hydrogenated soybean oil.
Soybean oil is a popular choice for frying due to its neutral taste and high smoke point, which means it can withstand high heat without breaking down or smoking.
It’s important to note that partially hydrogenated oils have been linked to health concerns, including an increased risk of heart disease. In response to these concerns, many food manufacturers, including fast-food chains like Popeyes, have removed partially hydrogenated oils from their products.
It’s also worth noting that the specific blend of oils used by Popeyes may vary by location and depending on availability.
However, soybean and partially hydrogenated soybean oil are commonly used in the fast-food industry for frying due to their low cost and availability.

Do Popeyes Batter Their Own Chicken?
Yes, Popeyes Louisiana Kitchen batters their chicken. Their chicken is marinated for 12 hours in a blend of Louisiana seasonings and then hand-battered, breaded, and fried.
The batter contains a flour, cornstarch, and spices blend, giving the chicken it’s crispy, flavorful coating. Above that, the breading process is done by hand, ensuring that each piece of chicken is coated evenly.
This process of marinating and battering the chicken in-house is one of the reasons why Popeyes chicken is known for its unique flavor and texture. It sets them apart from other fast-food chains that use pre-breaded or frozen chicken.
What Equipment Will You Need To Make Popeyes Fried Chicken?
- Large Bowl – Make the buttermilk and hot sauce mixture in the bowl and marinate the chicken in it.
- Medium Bowl – Use the medium bowl to make the egg, water, and hot sauce mixture.
- Dutch Oven – Fry the chicken in the Dutch oven.
- Spoon – Mix all the elements nicely using a spoon.
- Paper Towels – Use some paper-towels for soaking excess oil.
How Much Time Will You Need To Make Popeyes Fried Chicken?
| Preparation Time | Cooking Time | Marinating Time | Total Time |
|---|---|---|---|
| 10 Minutes | 20 Minutes | 45 Minutes | 1 Hour 15 Minutes |

What Ingredients Will You Need To Make Popeyes Fried Chicken?
- Chicken – You’ll be needing a whole chicken for this recipe.
- Buttermilk – Immerse the chicken fillets in the buttermilk for better texture and taste.
- Hot Sauce – Marinate the chicken in a hot sauce mixture to spice up the chicken filets.
- Eggs – Coat the chicken fillets with egg mixture to achieve desired crispy texture.
- Water – Add half a cup of water to the egg mixture. Adding water will result in better consistency.
- Kosher Salt – Season the chicken with salt.
- All-Purpose Flour – Cover the chicken with flour so that it becomes crispy when fried.
- Smoked Paprika – Smoked paprika will bring out the enhanced flavors.
- Black Pepper – Season the chicken fillets with a pinch of black pepper.
- Cayenne Pepper – Spice up the chicken with a pinch of cayenne pepper.
- Garlic Powder – Add all these spices to the flour so that even the chicken skin is flavored.
- Peanut Oil – Fry the chicken in peanut oil.
Steps To Make Popeyes Fried Chicken
- Take a large bowl and pour buttermilk and 2 tablespoons of hot sauce (Tabasco) into it.
- Stir it well and add the chicken pieces to the bowl. Cover and and marinate the chicken for 45 minutes or an hour.
- Meanwhile you can prepare the coating in two separate bowls.
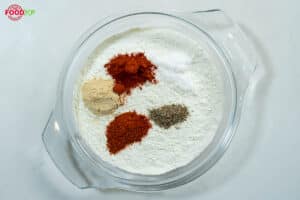
- In one bowl, add flour, garlic powder, paprika, salt, black pepper, and cayenne pepper. Mix the dry rubs and make sure there are no lumps.
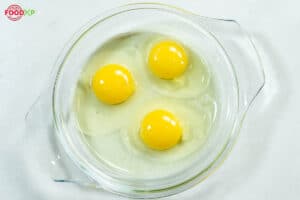
- Take another bowl to mix the three eggs. Beat the eggs nicely.
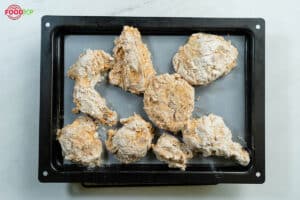
- Now you can take the pieces of marinated chicken, dredge them into flour and then dunk into the eggs.
- Lastly, coat the chicken pieces with some more flour and place it on a tray.
- To fry the chicken, take a large Dutch oven. Pour oil into it to a depth of 2½ inches and heat it to 325°F.
- Fry 4 pieces at a time for about 8 to 10 minutes until they turn golden brown. Soak excess oil on paper towels. Your Popeye’s fried chicken is ready.
Sauces That You Can Pair With Popeyes Fried Chicken
Fried chicken is so delicious and versatile that it can be paired with many sauces. Check out the list below to improve your fried chicken eating experience.
- Ketchup – Tomato ketchup is the ultimate dipping sauce to go with any fried food. Thanks to its sweet and tangy flavors that pair perfectly with fried items.
- Barbeque Sauce – Barbeque sauce comes in many varieties. They taste amazing with fried chicken by increasing the umami factor of the dish and adding a punch of sweet and savory flavors.
- Ranch – Ranch is a gorgeous dipping sauce to go with fried chicken. It gets its beautiful flavor from buttermilk, herbs, spices, onion, and mustard. This sauce also comes in many variations. Whichever way, it takes the fried chicken flavors to the next level.
- Honey Mustard Sauce – With its creamy texture and tangy flavors, honey mustard sauce is a great sauce to pair with fried chicken. It brings together sweet and tangy flavors that give a well-rounded taste to the fried items.
- Sriracha Sauce – If you like spicy flavors, sriracha sauce is what you need to try with fried chicken. It brings tangy, spicy, and sweet flavors to the table that complements the flavors of fried chicken.
- Buffalo Sauce – Buffalo sauce and fried chicken are a match made in heaven. This sauce features cayenne peppers, vinegar, spices, and garlic powder to add a pinch of spice.

How To Store Popeyes Fried Chicken?
There’s nothing quite like fried chicken. So, having some extra at hand to enjoy it later is always a good idea. But how do you store it? Here are the ways to store fried chicken to maintain its quality and taste.
Refrigerator
- Before you prepare to store your leftover fried chicken in the refrigerator, it should be cooled down properly.
- Place it in an airtight container. Alternatively, you can wrap individual fried chicken pieces in aluminum foil and keep them in freezer bags.
- Refrigerated fried chicken can stay in good condition for 5 days.
Freezer
You can also freeze your fried chicken by following the same steps as mentioned above. Fried chicken can be stored in the refrigerator for up to 12 months.
How To Reheat Fried Chicken?
Just like its storage, fried chicken is also easy to reheat. Follow the steps below to reheat the pre-cooked fried chicken.
If you have frozen fried chicken, it is important to thaw it first by placing it at room temperature for at least an hour before reheating it. For thawing, unwrap the chicken pieces and allow them to come down to room temperature. You can use an oven, microwave, or air fryer to reheat it.
Oven
- Cover the baking pan with parchment paper or aluminum foil.
- Place the chicken pieces in the pan.
- Reheat the fried chicken for about 20 minutes at 400 degrees.
Air Fryer
- Life has become easy with the help of air fryers. You can easily reheat your fried chicken or anything else in an air fryer.
- All you have to do is unwrap the pieces of fried chicken.
- Place them in the air fryer.
- Reheat them for 15-20 minutes.
Microwave
You can also reheat fried chicken in the microwave by placing it in a microwave dish. Reheat the pieces of fried chicken at 40 seconds intervals until they reach the desired temperature.
Nutritional Information
| Calories | 733 kcal |
| Fat | 27 g |
| Cholesterol | 161 mg |
| Sodium | 3140 mg |
| Carbohydrates | 77 g |
| Protein | 46 g |
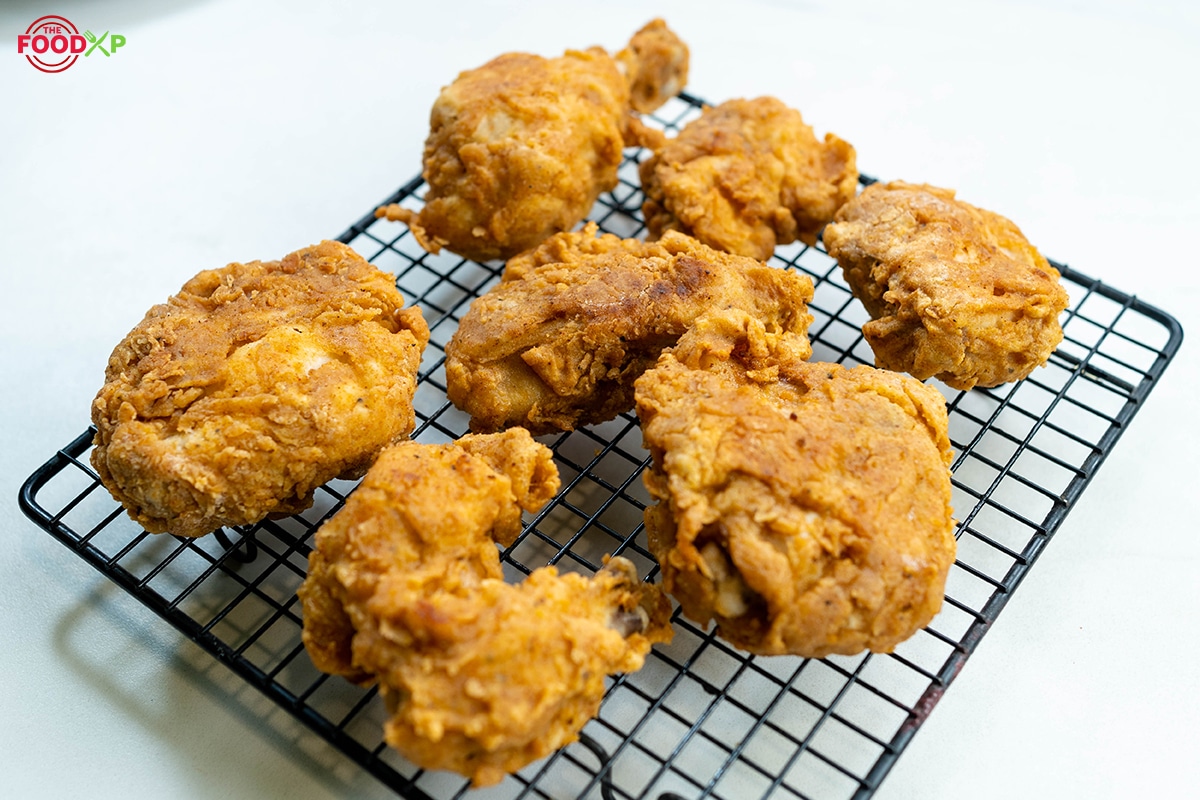
How Will Popeyes Fried Chicken Look And Taste Like?
If you are trying Popeyes fried chicken for the first time, you will notice a crispy, golden-brown exterior seasoned with a blend of spices.
When you have a bite of meat, you will see it is juicy and tender, with a slightly salty and savory flavor.
The chicken is delicious with crispy golden skin. The fired skinh, which is the flour mixture, is spicy and crispy. Inside is a tender and juicy chicken. You can enjoy it with your favorite dips like honey mustard or chili mayo.
Recipe Card
Popeyes Fried Chicken Recipe
Equipment
- Large Bowl
- Medium Bowl
- Dutch Oven
- Spoon
- Paper Towels
Ingredients
- 1 pound Whole Chicken
- 3 cup Whole Buttermilk
- 1 tablespoons Hot Sauce
- ⅓ cup Water
- 3 large Eggs
- 1 teaspoon Kosher Salt
- 1 cups All-Purpose Flour
- 1 teaspoons Paprika
- 1 teaspoons Black Pepper
- ½ teaspoons Cayenne Pepper
- 1 ½ teaspoons Garlic Powder
- 2 tablespoons Peanut Oil (for frying)
Instructions
- Take a large bowl and pour buttermilk and 2 tablespoons of hot sauce (Tabasco) into it. Stir it well and add the chicken pieces to the bowl. Cover and and marinate the chicken for 45 minutes or an hour.

- Meanwhile you can prepare the coating in two separate bowls. In one bowl, add flour, garlic powder, paprika, salt, black pepper, and cayenne pepper. Mix the dry rubs and make sure there are no lumps.
- Take another bowl to mix the three eggs. Beat the eggs nicely.
- Now you can take the pieces of marinated chicken, dredge them into flour and then dunk into the eggs.

- Lastly, coat the chicken pieces with some more flour and place it on a tray.
- To fry the chicken, take a large Dutch oven. Pour oil into it to a depth of 2½ inches and heat it to 325°F.

- Fry 4 pieces at a time for about 8 to 10 minutes until they turn golden brown. Soak excess oil on paper towels. Your Popeye’s fried chicken is ready.


Video

Nutrition
Frequently Asked Questions (FAQs)
Does Popeyes fry their chicken?
Popeyes chicken is freshly hand battered, then breaded and fried up. You’ll know the difference in the first bite. It’s extra crispy on the outside with a loud, mouth-watering crunch, and juicy and bursting with bold Louisiana flavor on the inside.
How long does Popeyes fry their chicken?
Popeyes fry their chicken for 30-40 minutes.
Is Popeyes Chicken frozen?
Popeyes bone-in chicken is always fresh and never frozen.
Which is healthier Popeyes or KFC?
Popeyes appears to be the bigger nutrition bomb in comparison with KFC.
Conclusion
Don’t forget to make this crispy fried chicken at your home and leave your experience, suggestions and queries in the comment section below. I’ll be happy to hear from you. Till then, happy eating!
This is really nice. You can try it with a lot of dips and sauces.
Step 8 should simply read repeat step 7.
Hello Gunner,
Thank you for pointing out the discrepancy. We have rectified it. Happy Cooking!
Amazing website and delicious recipes