In a world filled with chaos, all you need is comforting food. Boiled custard is such a dessert that will turn the frown upside down. I’ll provide you with an amazing recipe for boiled custard that’ll be the best part of your dinner.
The sweet and creamy dessert simply requires a handful of ingredients. You just need milk, sugar, eggs, and vanilla extract, that’s it. Your splendid custard is ready to serve.
The process of making it is explained in the article below with detailed information that contains everything you need.
What's In The Post
What Is Boiled Custard?
Boiled custard is a classic dessert made from milk, eggs, sugar, and vanilla that is slowly cooked and thickened on the stovetop.
Moreover, in many cultures, this astonishing Boiled Custard is a popular dessert, especially during the holiday season.

Why You’ll Love This Boiled Custard Recipe?
You’ll love this boiled custard for the following reasons:
- Comforting Food – Once you try this custard, there is no going back. It’s the most comforting food that provides amazing flavors and tastes. The smooth and creamy texture makes it the ultimate comforting food.
- Satisfies Cravings – Boiled Custard is one of the best foods that satisfies your day-to-day cravings. The flavors will make you fall in love with this Boiled Custard.
Is This Recipe Gluten-Free?
The fact that this custard is gluten-free will astound you. You can enjoy the custard even if you are on dietary restrictions. The recipe doesn’t include any ingredients that contain gluten.
Is Eggnog The Same As Boiled Custard?
There are some similarities between eggnog and Boiled Custard, but still, they are not the same. Here are some important differences that have been quoted for your reference:
- Eggnog is typically a beverage, while Boiled Custard is a dessert.
- Boiled Custard is made with milk, eggs, sugar, and vanilla extract, whereas eggnog is made with whipped cream, milk, sugar, eggs, and flavorings and is also spiked with alcohol sometimes.
- Eggnog is served cold while Boiled Custard can be served as warm and even chilled.
Equipment Required For Boiled Custard
- Bowl – Combine eggs, sugar, and vanilla extract in a bowl.
- Pan – Use a pan to make this boiled custard.
- Whisk – Use a whisk to mix all the ingredients.

Boiled Custard Ingredients
- Whole Milk – Whole milk creates a creamier base for the custard and adds a slightly sweet undertone.
- Eggs – Eggs contribute to a smooth texture and act as a binding agent that prevents custard from curdling.
- Sugar – Sugar brings perfect sweetness to the custard. Add it as per your taste preferences.
- Vanilla Extract – Add one teaspoon of vanilla extract, and it’ll be a game changer for you. It’ll bring out the aromatic, sweet, and musky flavor in the custard.
Boiled Custard Ingredients Substitutions
- Half-And-Half Milk – If you don’t want to use whole milk to make this boiled custard, replace it with half-and-half milk. As it has a higher fat content which will help in making the custard thicker and tastier.
- Maple Syrup – If you enjoy the taste of maple syrup more than vanilla extract, simply use maple syrup. Maple syrup has a stronger flavor than vanilla extract. Hence, make sure to start by adding small amounts.
- Brown Sugar – If you are looking for a good alternative to sugar, swap it with brown sugar. It’s the best sugar substitute. It’ll be a good and even healthy substitute for sugar.

Boiled Custard Preparation And Cooking Time
| Preparation Time | Cooking Time | Total Time |
|---|---|---|
| 5 Minutes | 25 Minutes | 30 Minutes |
Boiled Custard Recipe Steps

Step 1- Add milk to a pan and let it heat for a few minutes.

Step 2- Meanwhile, take a bowl and add two eggs to it.

Step 3- Add sugar to the same bowl.

Step 4- After mixing sugar and eggs, pour milk into the mix.

Step 5- Add vanilla extract to the mix.

Step 6- Pour the mixture into the pan.

Step 7- Let the mix heat until it becomes thick.
Step 8- Your delectable custard is ready to serve.
Tips To Make This Boiled Custard Better?
Our recipe can be satisfying, but I would still love to help you up your game of boiled custard. Below, you are gonna get the most amazing tips and tricks to make a better version of this boiled custard.
- Serve With Some Toppings – To make your custard more delicious, garnish it with some toppings. Use whipped cream, fresh fruits, toasted nuts, or sprinkle nutmeg or cinnamon for more flavors.
- Get Creative – If you want to add more flavors to your custard, then get creative. Experiment with chocolate, caramel, coffee, or liqueurs. Your custard will give you the best experience of flavors.
- Balance Sweetness – Boiled Custard sweetness reduces once chilled, so you have to carefully adjust the sweetness in the custard. It also depends on your personal preferences.
- Use Quality Ingredients – If you don’t use good quality ingredients, it may negatively affect the taste of the custard. Ensure to use high-quality ingredients as they bring out better taste and flavors.

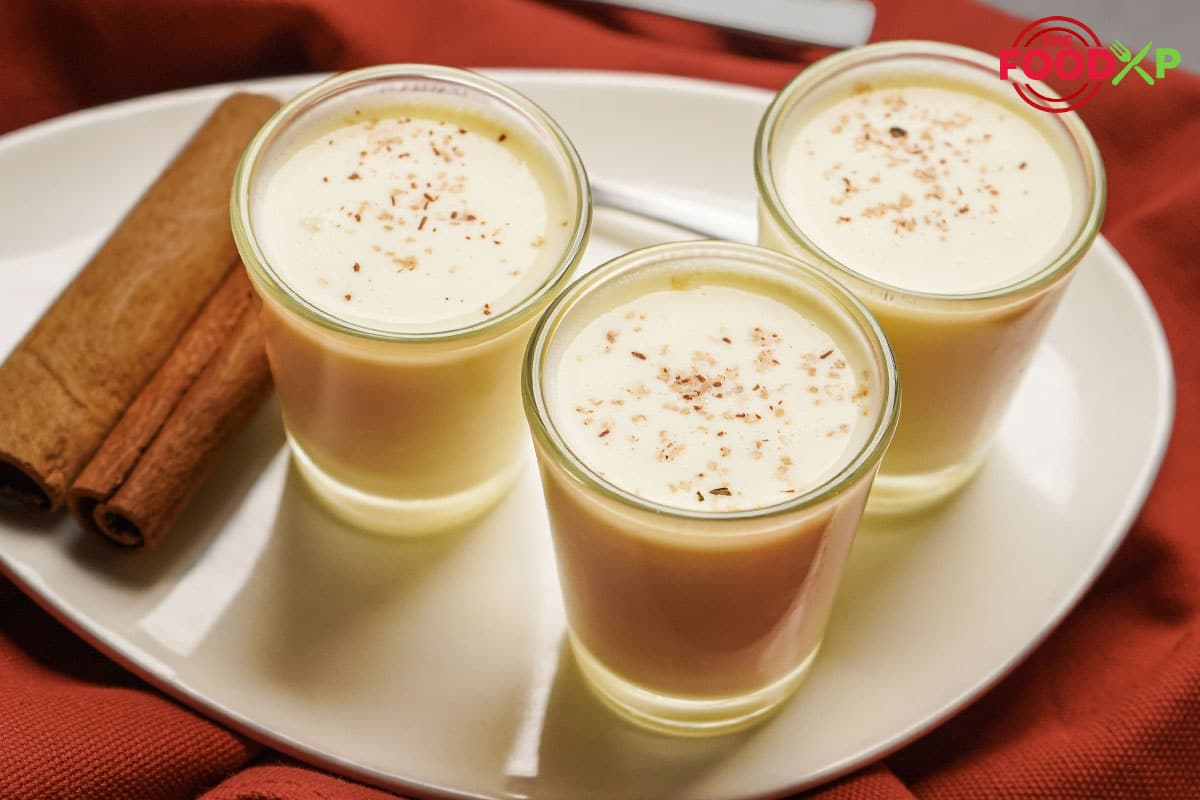
How Will This Boiled Custard Look & Taste Like?
Boiled Custard is filled with a rich, sweet, and creamy taste that leaves you drooling. It’ll be the best dessert that you will fall in love with. The hint of vanilla adds a delicious flavor to the custard.
Furthermore, it has a bright yellow, visually appealing color. The creamy and smooth texture will just melt in your mouth. It’s a perfect dessert for any occasion and holiday.
The sweet, creamy, and rich taste of this Boiled Custard will leave you drooling. It’ll be the best dessert that you will fall in love with. The hint of vanilla adds a delicious flavor to the custard.
Why Is Your Boiled Custard Lumpy?
Sometimes, the boiled custard turns out to be lumpy unexpectedly. Fret not! I have a list of possible reasons that you can cross off your list to make the perfect boiled custard.
- Improper And Incomplete Stirring – If the ingredients of the custard are not mixed thoroughly, then lumps may be created. So, it’s necessary to stir the custard properly while work is in process to avoid lumps.
- Wrong Cooking Temperature – Cooking the custard for too long or at a high temperature may cause the eggs to curdle, which causes lumps.
Why Is Your Custard Curdling?
Your custard is curdling due to some mistakes that you are making while preparing the custard. Please take a look at the following pointers to identify the mistakes you might be making:
- Overcooking – Custard needs to be cooked until it thickens; it should not be allowed to reach its boiling point. Overcooking causes lumps, resulting in curdling. So, make sure that you don’t overcook your custard.
- Cooked On High Flame – Cooking the custard at high flame causes the eggs to coagulate too quickly, which leads to curdling. Hence, to avoid curdling, ensure that you cook your custard at low to medium heat.

Boiled Custard Nutritional Values
Boiled Custard is not great when it comes to healthy options, but there is compromise in its taste. However, you can have it in moderation, which you are not gonna regret. It does provide some protein content. To know the exact nutritional values, go through the table cited below:
| Calories | 216.2 kcal |
| Protein | 7.9 g |
| Carbohydrates | 30.8 g |
| Sugar | 30.8 g |
| Fat | 7.1 g |
| Calcium | 154.7 mg |
Tips To Make It More Healthy
You can make a healthier version of this Boiled Custard, and to make it possible, make sure to read out the pointers mentioned below:
- Honey – To make a healthier version of this Boiled Custard, try using honey. It has a lower glycemic index as compared to sugar, which causes a gradual increase in blood sugar levels after consumption.
- Use Low-Fat Milk – If you want to make your custard healthy, opt for low-fat milk or skim milk instead of whole milk. It’ll reduce the fat content in the custard.
- Add Fruits – There is nothing better than adding fruits to the custard to make it healthier. Prefer using pureed fruits like bananas, strawberries, or mangoes for added nutrients.
- Top With Nuts – To add more nutrients and health benefits to the custard, sprinkle chopped nuts or seeds. Some excellent options are almonds, walnuts, and chia seeds.
Can You Make This Boiled Custard Ahead Of Time?
I would love to tell you that this Boiled Custard can be made in advance. As you are gonna get some great advantages when made in advance. To know in detail, dig into the benefits mentioned below:
- Easy For Further Use – Making this Boiled Custard in advance is the easiest way to serve the next day without stress. It’s going to be very convenient as there will be no time crunch. You can easily enjoy it for up to two to three days.
- Flavor Enhancement – Allowing the custard to rest in the refrigerator overnight helps in enhancing the flavors. Ensure to refrigerate it for safer storage.
- Planning – If you are planning a get-together or dinner party, then making this Boiled Custard earlier will make things way too easy for you. Instead of wasting your time in the kitchen, you can make the custard the night before and serve it the next day.
How Can You Store This Recipe?
You are gonna thank me later for providing the ways to store the recipe. Although there is no chance of any leftovers, if by any means it’s happening, then you may look at the methods mentioned below:
- Refrigerate – Refrigerating the delicious Boiled Custard is the best way to prolong its shelf life. You can enjoy it in the next three to four days when it is made. However, you have to make sure that it is properly sealed in an airtight container so that it doesn’t lose its flavors and textures.
- Freezing – To increase the shelf life of the Boiled Custard, transfer it to an airtight container or in a freezer-safe bag and store it in the freezer. But make sure to thaw it for a few hours before serving.
- Room Temperature – Keeping the Boiled Custard at room temperature is not considered a great option. However, it is preferred to keep it at room temperature so that it is completely cool.
What To Serve With Boiled Custard?
Boiled Custard is itself an enjoyable dessert but if you are looking for some dishes to serve along, then have a look below and you will find many options to pair with.
- Jamie Oliver Apple Crumb – Boiled Custard is a great dessert, but how about pairing it with apple crumb? I assure you that this combo will take the flavors to the next level. Jamie Oliver Apple Crumb is a perfect way to add more flavors and taste to your meal.
- Bobby Flay Buttermilk Biscuits – Pair your Boiled Custard with biscuits for a crunchy experience. You can enjoy Boiled Custard with crispy Bobby Flay buttermilk biscuits in the evenings as snacks. You are gonna love the experience.
- McDonald’s Chocolate Chip Cookies – Someone who is a great fan of cookies and custard is surely going to love this combination. Eat the delicious Boiled Custard with chocolate chip cookies and watch the magic unfold.
- Guyanese Beef Patties – If you are a beef lover, then you are gonna love this crazy duo. Beef patties will just act as a cheery on a cake with this Boiled Custard. These patties are best to add more flavors to your custard.
Boiled Custard Printable Version
Boiled Custard Recipe
Equipment
- Bowl
- Pan
- Whisk
Ingredients
- 1 Quart Whole Milk
- 5 Large Eggs
- 1 Cup Sugar
- 1 Teaspoon Vanilla Extract
Instructions
- Add milk to a pan and let it heat for a few minutes.

- Meanwhile, take a bowl and add two eggs to it.
- Add sugar to the same bowl.
- After mixing sugar and eggs, pour milk into the mix.
- Add vanilla extract to the mix.
- Pour the mixture into the pan.
- Let the mix heat until it becomes thick.
- Your delectable custard is ready to serve.


Video
Nutrition
Frequently Asked Questions (FAQs)
What Is Boiled Custard?
Boiled custard is a classic dessert made from milk, eggs, sugar, and vanilla that is slowly cooked and thickened on the stovetop.
Can Boiled Custard Be Made Ahead Of Time?
Yes, boiled custard can be made ahead of time and stored in the refrigerator for up to 3 days.
Is Boiled Custard The Same As Custard Sauce?
Boiled custard is similar to custard sauce but typically thicker and richer in texture.
Can Boiled Custard Be Frozen?
Yes, boiled custard can be frozen, but the texture may change slightly once it thaws.
Is Boiled Custard A Traditional Holiday Dessert?
Boiled custard is a popular dessert during the holiday season, particularly in the southern United States.
Conclusion
That’s it! We tried our best to give the most authentic information about the recipe for Boiled Custard. Now, you have to follow the entire recipe as it is for the perfect flavors and texture. Moreover, try making the dish at home and make sure to come back and share your experience.