Cooking for Thanksgiving brings joy. The recipe I am sharing is preferred to be cooked particularly for Thanksgiving Day. The recipe is bell stuffing.
Not only will this recipe be a useful baste for the turkey, but it can also be served as a side dish. It can be served with pumpkin soup. This stuffing is an American cuisine made with the oldest American spices. It was created by William G. Bell of Newton, Massachusetts, in 1867.
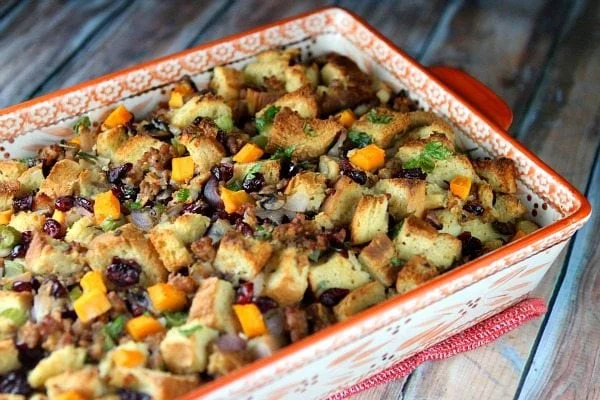
Bell stuffing is cooked by sautéing onions and celery in melted butter. Transfer them to a bowl of cubed bread. Pour broth to it with bell’s seasoning, kosher salt and pepper. Use it to stuff the turkey and roast the turkey. Cool it down a bit and serve.
This was just a brief of the recipe. You will learn more details of the recipe further. Take a note of them and you will get a perfect result. But here are some other amazing recipes that you should definitely try.
1. Sous Vide Pastrami- Sous vide is a technique used to cook meat into tender and moist meat. If you like your meat to be slowly cooked and taste smoky, then this recipe is for you.
2. Lomo de Cerdo– Lomo de Cerdo is a very tasty Spanish recipe. Here is an authentic Spanish recipe of Lomo de Cerdo which you can easily make at home.
3. Sweet Potato Crunch- Sweet Potato Crunch is buttery sweet potatoes mashed with brown sugar, buttermilk and topped with pecans and crumble of flour and brown sugar. This is a perfect combination with turkey because of the crunch it gives.
4. Smoked Pineapple– In this recipe, the pineapple is baked over a grill with some honey brushed on its surface. The smoky and grilled flavor makes it a treat for the tongue.
What's In The Post
Ingredients For Bell Stuffing
- 3/4 Cup Onion (Minced)
- 3/4 Cup Celery (Chopped)
- 8 Tablespoons Butter
- 16 Slices White Bread (Cubed & Left Overnight On Baking Sheet To Stale)
- 1 1/2 Cups Poultry Broth
- 1 Tablespoon Bell’s Seasoning
- 1 Teaspoon Kosher Salt
- 1/2 Teaspoon Freshly Ground Pepper
Looking at the ingredients, I guess you will be able to find them in your kitchen itself. The ingredients for this recipe are readily accessible at any supermarket. Let’s move on to the preparation time of this recipe.
How Much Time Will It Take To Make Bell Stuffing?
| Preparation Time | Cooking time | Total time |
|---|---|---|
| 20 Minutes | 45 Minutes | 1 Hour 5 Minutes |
You get this dish in almost an hour. This is a traditionally American cuisine and is surely loved by everyone. To cook this dish, below mentioned steps are to be followed.
Steps To Make Bell Stuffing

- Take a small saucepan and melt butter in it over medium-high flame. Add onions and celery. Cook them for 8 minutes or till they turn golden and soft.
- Add cubed pieces of bread to a large bowl. Transfer the onions and celery to it. Pour broth, bell’s seasoning, kosher salt and pepper. Toss them well.
- Stuff this mixture into the turkey and roast the turkey as per the size.
- You can even bake the stuffing in a preheated oven at 350 degrees using a greased baking dish. Cover and bake for 45 minutes until the top of the stuffing gets crisped. Remove it from the oven and cool it down a bit before serving.
- Serve as desired.
Use this to stuff the turkey or as a side dish.
Nutritional Breakdown of Bell Stuffing
Check out the nutritional value this recipe will offer you.
| Calories | 100 |
| Protein | 3 g |
| Carbohydrates | 21 g |
| Fat | 1 g |
| Cholesterol | 0 mg |
| Sodium | 530 mg |
How To Make Bell Stuffing At Home | Video
If you are unclear of any step then watch this similar video I have uploaded of this recipe. You will get the clarity for sure.
In case you have any query, feel free to write them up in the comment section below. I will be happy to help you with it. If you have any suggestions, use the same section to convey them to me. I will try my best to respond to the same. Have a great day!